前言
网络上关于Spring Security实现登录注册的文章很多,但大多存在2个问题,一是讲的不清不楚,看完文章还是没明白怎么使用;二是比较陈旧。本文在前文基础上做了些的改进,尽量讲清楚如何使用。(请注意,本文是入门教程,只讲如何使用,不涉及源码分析)
准备
IDEA
Spring Boot 2.1.0
Spring Security 5.1
Thymeleaf 3.0
JDK 1.8
Maven 3.5.2
1
2
3
4
5
6
7
8
9
10
11
12
13
14
15
16
17
18
19
20
21
22
23
24
25
26
27
28
29
30
31
32
33
34
35
36
37
38
39
40
41
42
43
44
45
46
47
48
49
50
51
52
53
54
55
56
57
58
59
60
61
62
63
64
65
66
67
68
69
70
71
72
73
74
<?xml version="1.0" encoding="UTF-8" ?> <project xmlns ="http://maven.apache.org/POM/4.0.0" xmlns:xsi ="http://www.w3.org/2001/XMLSchema-instance" xsi:schemaLocation ="http://maven.apache.org/POM/4.0.0 http://maven.apache.org/xsd/maven-4.0.0.xsd" > <modelVersion > 4.0.0</modelVersion > <groupId > com.geelaro</groupId > <artifactId > register</artifactId > <version > 0.0.1-SNAPSHOT</version > <packaging > jar</packaging > <name > register</name > <description > Demo project for Spring Boot</description > <parent > <groupId > org.springframework.boot</groupId > <artifactId > spring-boot-starter-parent</artifactId > <version > 2.1.0.RELEASE</version > <relativePath /> </parent > <properties > <project.build.sourceEncoding > UTF-8</project.build.sourceEncoding > <project.reporting.outputEncoding > UTF-8</project.reporting.outputEncoding > <java.version > 1.8</java.version > </properties > <dependencies > <dependency > <groupId > org.springframework.boot</groupId > <artifactId > spring-boot-starter-data-jpa</artifactId > </dependency > <dependency > <groupId > org.springframework.boot</groupId > <artifactId > spring-boot-starter-security</artifactId > </dependency > <dependency > <groupId > org.springframework.boot</groupId > <artifactId > spring-boot-starter-thymeleaf</artifactId > </dependency > <dependency > <groupId > org.thymeleaf.extras</groupId > <artifactId > thymeleaf-extras-springsecurity5</artifactId > </dependency > <dependency > <groupId > org.springframework.boot</groupId > <artifactId > spring-boot-starter-web</artifactId > </dependency > <dependency > <groupId > mysql</groupId > <artifactId > mysql-connector-java</artifactId > <scope > runtime</scope > </dependency > <dependency > <groupId > org.springframework.boot</groupId > <artifactId > spring-boot-starter-test</artifactId > <scope > test</scope > </dependency > <dependency > <groupId > org.springframework.security</groupId > <artifactId > spring-security-test</artifactId > <scope > test</scope > </dependency > </dependencies > <build > <plugins > <plugin > <groupId > org.springframework.boot</groupId > <artifactId > spring-boot-maven-plugin</artifactId > </plugin > </plugins > </build > </project >
其他具体配置请在文末看代码。
创建Model
先创建一个User实体,再创建一个Role。
User
1
2
3
4
5
6
7
8
9
10
11
12
13
14
15
16
17
18
19
20
21
22
23
24
25
26
27
28
29
@Entity public class User { @Id @GeneratedValue(strategy = GenerationType.AUTO) private Long id; @Column(nullable = false,unique = true) private String name; @Column(nullable = false) private String passWd; @Column(nullable = false,unique = true) private String email; @Column(nullable = false) private Long createTime; @Column(nullable = false) private Long lastModifyTime; @ManyToMany(fetch = FetchType.EAGER) @JoinTable(name = "users_roles", joinColumns = @JoinColumn(name = "user_id", referencedColumnName = "id"), inverseJoinColumns = @JoinColumn(name = "role_id", referencedColumnName = "id")) private List<Role> roles; }
Role
1
2
3
4
5
6
7
8
9
10
11
12
13
14
15
16
17
@Entity public class Role { @Id @GeneratedValue(strategy = GenerationType.AUTO) private Long id; @ManyToMany(mappedBy = "roles") private Collection<User> users; private String name; public Long getId () { return id; } }
同时还需要再创建一个data transfer object (DTO)表单,用作web和服务层中介。
1
2
3
4
5
6
7
8
9
10
11
12
13
14
15
16
17
18
19
20
21
22
23
public class UserDto { @NotEmpty @NotNull private String name; @NotEmpty @NotNull @Email private String email; @NotEmpty @NotNull @Size(min = 6,max = 20) private String passWd; @NotEmpty @NotNull @Size(min = 6,max = 20) private String matchPassWd; }
@NotEmpty 限制不为空,@Size限制了密码最短6位,最长20位。
服务层
dao层UserRepository、RoleRepository接口,直接继承JpaRepository.
1
2
3
4
5
6
7
8
9
10
11
12
# User public interface UserRepository extends JpaRepository<User,Long> { User findByNameOrEmail(String name,String email); User findByEmail(String email); User findByName(String name); } # Role public interface RoleRepository extends JpaRepository<Role,Long> { Role findByName(String name); }
UserService 接口
1
2
3
4
5
6
7
8
public interface IUserService { User save(User user); User findByEmail(String email); User findByName(String name); boolean checkUserByName(String name); boolean checkUserByEmail(String email);
UserService接口实现
1
2
3
4
5
6
7
8
9
10
11
12
13
14
15
16
17
18
19
20
21
22
23
24
25
26
27
28
29
30
31
32
33
34
35
36
37
38
39
40
41
42
43
44
45
46
47
48
49
50
51
52
53
54
55
@Service public class UserService implements IUserService { @Autowired private UserRepository userRepository; @Autowired private RoleRepository roleRepository; @Autowired private BCryptPasswordEncoder passwordEncoder; @Transactional @Override public User save(User user) { return userRepository.save(user); } @Override public User findByEmail(String email) { return userRepository.findByEmail(email); } @Override public User findByName(String name) { return userRepository.findByName(name); } @Override public boolean checkUserByName(String name) { User user = findByName(name); return user != null; } @Override public boolean checkUserByEmail(String email) { User user = findByEmail(email); return user != null; } /** * 创建一个新的user,角色为ROLE_USER * @param userDto * @return */ public User registerNewAccount(UserDto userDto) { User user = new User(); user.setEmail(userDto.getEmail()); user.setName(userDto.getName()); user.setPassWd(passwordEncoder.encode(userDto.getPassWd())); user.setRoles(Arrays.asList(roleRepository.findByName("ROLE_USER"))); user.setCreateTime(new Date().getTime()); user.setLastModifyTime(new Date().getTime()); return save(user); } }
Web层
写了4个页面,首页”/“,注册”/register”、登录”/login”,以及登录后的用户信息详情页”/userInfo”。把他们分别放到两个controller中,method为get的放到IndexController,需要数据处理的放在UserController中。
IndexController
1
2
3
4
5
6
7
8
9
10
11
12
13
14
15
16
17
18
19
20
21
22
23
24
@Controller public class IndexController { @GetMapping("/") public String index(){ return "index"; } @GetMapping("/register") public String createUser(Model model){ model.addAttribute("user",new UserDto()); return "register"; } @GetMapping("/login") public String login(Model model){ model.addAttribute("user",new UserDto()); return "login"; } @GetMapping("/login?error") public String loginError(Model model){ model.addAttribute("loginError",true); return "login"; }
UserController
1
2
3
4
5
6
7
8
9
10
11
12
13
14
15
16
17
18
19
20
21
22
23
24
25
26
27
28
29
30
31
32
33
34
35
36
37
38
39
40
41
42
43
44
45
46
47
48
49
50
51
52
53
54
55
56
57
58
59
60
61
62
63
64
@Controller public class UserController { private final Logger logger = LoggerFactory.getLogger(this.getClass().getName()); @Autowired private UserService userService; @PostMapping("/register") public String createUser(@ModelAttribute("user") @Valid UserDto userDto, BindingResult result, Model model) { if (result.hasErrors()) { return "register"; } //check name 是否已使用 if (userService.checkUserByName(userDto.getName())) { result.rejectValue("name", "error.user", "name已使用"); logger.info("name已存在!"); return "register"; } //check email 是否已注册。 if (userService.checkUserByEmail(userDto.getEmail())) { result.rejectValue("email", "error.user", "Email已注册"); logger.info("email已注册!"); return "register"; } //check password equal if (!checkPassWordUniform(userDto.getPassWd(),userDto.getMatchPassWd())){ result.rejectValue("passWd","error.user","两次输入密码不一致"); return "register"; } try { createUserAccount(userDto); } catch (DataIntegrityViolationException e) { result.rejectValue("email", "error.user","Email already exists."); result.rejectValue("name", "error.user","Name already exists"); } return "redirect:/userInfo"; } @GetMapping("/userInfo") public String userInfo(Model model) { UserDetails userDetails = (UserDetails) SecurityContextHolder.getContext().getAuthentication().getPrincipal(); String name = userDetails.getUsername(); String date = new SimpleDateFormat("yyyy-MM-dd HH:mm:ss").format(new Date()); model.addAttribute("name", name); model.addAttribute("date", date); return "userInfo"; } private User createUserAccount(UserDto userDto) { User registered = null; registered = userService.registerNewAccount(userDto); return registered; } private boolean checkPassWordUniform(String passWd,String matchPassWd){ return passWd.equals(matchPassWd); }
注册时,使用@Valid注解启用表单验证,因为整体比较简单,自定义验证我也写在了controller中。最好的是另外写一个类实现Validator接口,在类中自定义表单验证。
这样注册功能就已经完成了,接下来来看登录。
认证配置
Spring Security是自带登录逻辑的,我们只需要配置和自定义登录界面,其他的交给Security处理。新建一个WebSecurityConfig 继承 WebSecurityConfigurerAdapter类。
1
2
3
4
5
6
7
8
9
10
11
12
13
14
15
16
17
18
19
20
21
22
23
24
25
26
27
28
29
30
31
32
33
34
35
36
37
38
39
40
41
42
43
44
45
46
47
48
49
50
51
52
53
54
55
56
57
@Configuration @EnableWebSecurity public class WebSecurityConfig extends WebSecurityConfigurerAdapter { @Autowired private DataSource dataSource; @Autowired private CustomUserDetailService userDetailService; /** * 密码加密 * @return */ @Bean public BCryptPasswordEncoder passwordEncoder(){ return new BCryptPasswordEncoder(); } /** * auth的方式 * @param auth * @throws Exception */ @Override protected void configure(AuthenticationManagerBuilder auth) throws Exception { auth.userDetailsService(userDetailService).passwordEncoder(passwordEncoder()); } @Override protected void configure(HttpSecurity http) throws Exception { http .csrf().disable() //csrf不可用 .authorizeRequests() .antMatchers("/static/**","/css/**").permitAll() //访问允许静态文件 .antMatchers("/","/register").permitAll() //允许访问首页和注册页 .anyRequest().authenticated() .and() .formLogin().loginPage("/login").failureUrl("/login?error")//指定登录页和登录失败页 .defaultSuccessUrl("/userInfo") //登录成功跳转页 .usernameParameter("name") .passwordParameter("passWd") .and() .logout().logoutSuccessUrl("/login").permitAll() //退出登录跳转页 .and() .rememberMe() //remember me .tokenRepository(tokenRepository()) //存储 .userDetailsService(userDetailService) .tokenValiditySeconds(24*60*60);//token有效期24h } public PersistentTokenRepository tokenRepository(){ JdbcTokenRepositoryImpl db = new JdbcTokenRepositoryImpl(); db.setDataSource(this.dataSource); return db; }
这个配置比较繁琐,我在比较难缠的地方加了注解。Spring Security要求如果要自定义账号密码,需要实现自带的UserDetailService接口,用户验证当前用户。其中CustomUserDetailService就是我们实现的类,而UserDetails 是 Spring 用来记录当前用户,就是用户登录完之后,系统里保存就是当前这个用户的 UserDetails,所以可以在不同的用户端显示不同的内容。
1
2
3
4
5
6
7
8
9
10
11
12
13
14
15
16
17
18
19
20
21
22
23
24
25
26
27
28
29
30
31
@Service public class CustomUserDetailService implements UserDetailsService { private final static Logger logger = LogManager.getLogger(CustomUserDetailService.class); @Autowired private UserRepository userRepository; @Override public UserDetails loadUserByUsername(String name) throws UsernameNotFoundException { User user = userRepository.findByName(name); if (user==null){ logger.error("Not Found name "+ name); throw new UsernameNotFoundException("Not Found name "+ name); } return new org.springframework.security.core.userdetails.User( user.getName(), user.getPassWd(), getAuthorities(user.getRoles())); } private static List<GrantedAuthority> getAuthorities (List<Role> roles) { List<GrantedAuthority> authorities = new ArrayList<>(); for (Role role:roles){ authorities.add(new SimpleGrantedAuthority(role.getName())); } return authorities; } }
视图层
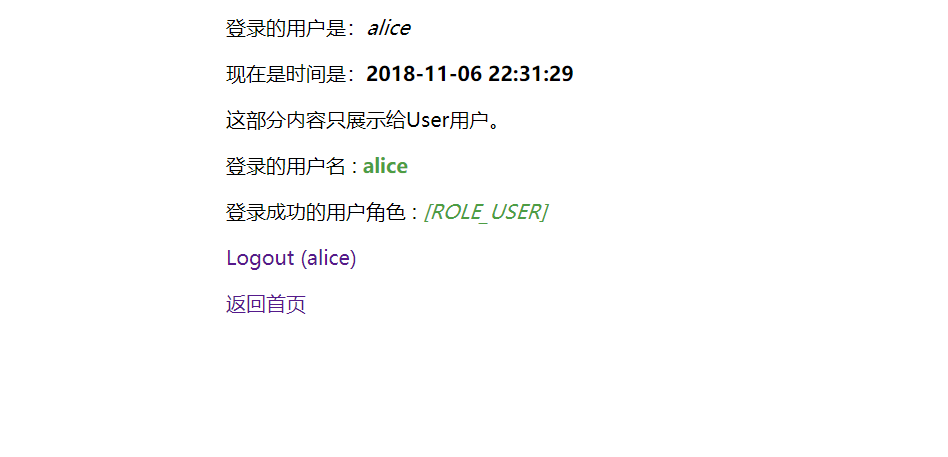
获取当前用户有2个方法:
代码层
1
2
UserDetails userDetails = (UserDetails) SecurityContextHolder.getContext().getAuthentication().getPrincipal(); String name = userDetails.getUsername();
HTML
1
2
3
4
5
6
<div> <p>登录的用户名 : <strong class="reg" sec:authentication="name"></strong> </p> 登录成功的用户角色 : <em class="reg" sec:authentication="principal.authorities"></em> </div>
验证
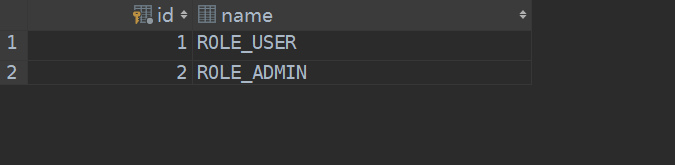
首先在表Role插入两条数据,”ROLE_USER”和”ROLE_ADMIN”,然后启动程序。
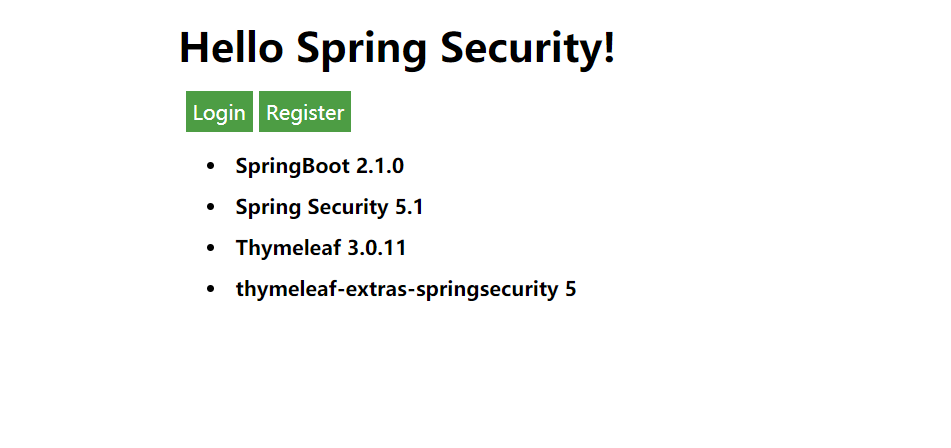
未登录首页
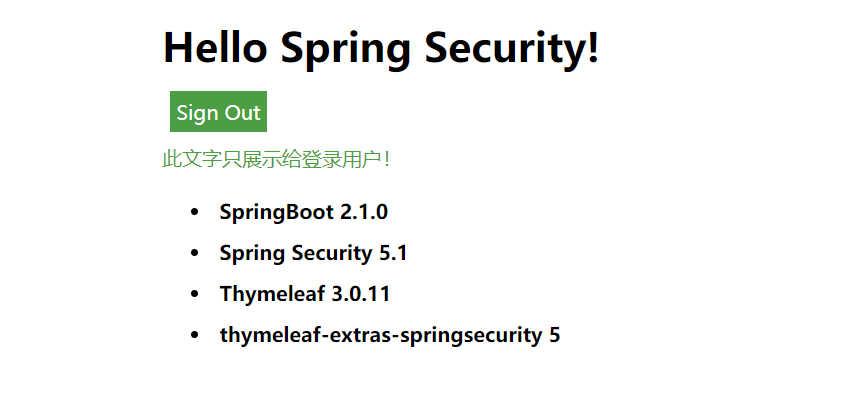
登录后首页
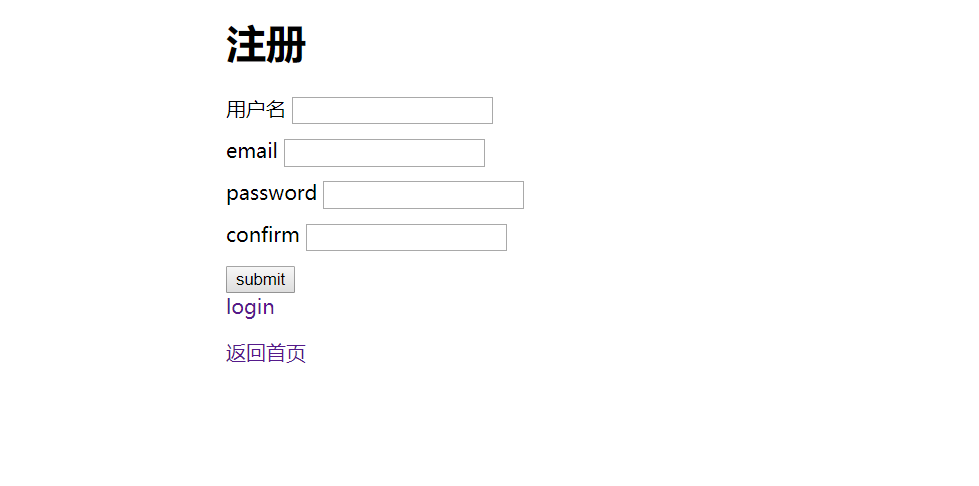
注册一个user
登录的用户详情页
Remember me
Spring Security 有remember me功能,使用十分简单。
前端login.html中添加 `
`,后端WebSecurityConfig添加一个存储方法即可。
1
2
3
4
5
6
7
8
9
public PersistentTokenRepository tokenRepository(){ //存储内存,不推荐 // InMemoryTokenRepositoryImpl memory =new InMemoryTokenRepositoryImpl(); // return memory; /** 存档到数据库中 **/ JdbcTokenRepositoryImpl db = new JdbcTokenRepositoryImpl(); db.setDataSource(this.dataSource); return db; }
选择存储到数据库时,需要手动建表”persistent_logins”,建表sql:
1
2
3
4
5
6
7
8
9
DROP TABLE IF EXISTS `persistent_logins`; CREATE TABLE `persistent_logins` ( `username` varchar(64) NOT NULL, `series` varchar(64) NOT NULL, `token` varchar(64) NOT NULL, `last_used` timestamp NOT NULL DEFAULT CURRENT_TIMESTAMP ON UPDATE CURRENT_TIMESTAMP, PRIMARY KEY (`series`) ) ENGINE=InnoDB DEFAULT CHARSET=utf8; SET FOREIGN_KEY_CHECKS=1;
踩过的坑
login中thymeleaf的坑
如果login.html中form表单input 标签中使用的th:field="*{}",那么在WebSecurityConfig一定要添加这"usernameParameter"和"passwordParameter",不然登录后报错"name not found".
1
2
3
4
5
6
7
8
@Override protected void configure(HttpSecurity http) throws Exception { http ........... .formLogin().loginPage("/login").failureUrl("/login?error") .defaultSuccessUrl("/userInfo") .usernameParameter("name") .passwordParameter("passWd")
如果使用的是<input type=password name ="password />,则配置类中不需要添加这两个。
thymeleaf-extras-springsecurity
Spring Boot 2.0默认使用的Spring Security版本是5.x,根据官网[thymeleaf-extras-springsecurity](https://github.com/thymeleaf/thymeleaf-extras-springsecurity)
thymeleaf-extras-springsecurity3 for integration with Spring Security 3.x
选择的thymeleaf-extras-springsecurity版本应是:
1
2
3
4
<dependency> <groupId>org.thymeleaf.extras</groupId> <artifactId>thymeleaf-extras-springsecurity5</artifactId> </dependency>
代码及参考文章
Spring-security-login-register Spring Boot Security下的注册登录